Live
Monitoring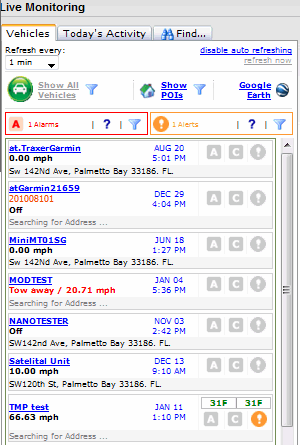 This is the live tracking page. Here you will
be able to see where all your GPS devices are located NOW.You can
also find the closest vehicle or a route to different types of
destinations. Each GPS tracking device is configured to report its
position every a certain amount of time. This interval could be
hours or could minutes. Every time a GPS device’s current position
is received on the at.Compass server it will automatically be shown
on the Live Monitoring page. The vehicle, person or asset position
will be updated on the map and it will also be updated on the
vehicle’s text information on the left side of the screen. The
first parameter you can modify on this page is the “Refresh every”
parameter. As explained on the Preferences session, this parameter
lets you adjust how often you want the Live Monitoring page to
refresh (connect to the at.Compass server) in order to show updates
on vehicles positions. This parameter should not be mistaken by the
time interval each GPS devices reports its current position. To the
right of “Refresh every” you will find 2 selections: “disable auto
refreshing” and “refresh now”. These options let you stop the
automatic refresh and let you refresh any time you want by clicking
on “refresh now”. If you want to enable auto refresh again then
just click on “enable auto refreshing”. At.Compass v3 has added in
Live Monitoring windows a new column for each vehicle in Live
Monitoring windows. The column is been added to warn about the
alert activation which has been defined for each vehicle by the
user. Normally this icon is gray and changes its color when the
alert has been triggered. Once a user click on it, at.Compass opens
the Inbox and shows a message about what alert has been activated
and which user has read or attended this alert.
On the right you can see a picture with the
options
This is the live tracking page. Here you will
be able to see where all your GPS devices are located NOW.You can
also find the closest vehicle or a route to different types of
destinations. Each GPS tracking device is configured to report its
position every a certain amount of time. This interval could be
hours or could minutes. Every time a GPS device’s current position
is received on the at.Compass server it will automatically be shown
on the Live Monitoring page. The vehicle, person or asset position
will be updated on the map and it will also be updated on the
vehicle’s text information on the left side of the screen. The
first parameter you can modify on this page is the “Refresh every”
parameter. As explained on the Preferences session, this parameter
lets you adjust how often you want the Live Monitoring page to
refresh (connect to the at.Compass server) in order to show updates
on vehicles positions. This parameter should not be mistaken by the
time interval each GPS devices reports its current position. To the
right of “Refresh every” you will find 2 selections: “disable auto
refreshing” and “refresh now”. These options let you stop the
automatic refresh and let you refresh any time you want by clicking
on “refresh now”. If you want to enable auto refresh again then
just click on “enable auto refreshing”. At.Compass v3 has added in
Live Monitoring windows a new column for each vehicle in Live
Monitoring windows. The column is been added to warn about the
alert activation which has been defined for each vehicle by the
user. Normally this icon is gray and changes its color when the
alert has been triggered. Once a user click on it, at.Compass opens
the Inbox and shows a message about what alert has been activated
and which user has read or attended this alert.
On the right you can see a picture with the
options  and
and  (in gray color) for every
vehicle. The first option includes all alarmas that has been
preconfigured for this vehicule, the second icon is associated to
the commands activated for the vehicule. These commands have been
added in version 3: Engine Off, Light-Horn On/Off and Current
Vehicle Location. When the user moves the mouse over the icons, it
pops up the name of the functionality associated to each one. To
activate Engine Off and Light-Horn On/Off functionalities the user
has to use an electronic circuit installed together with the tracer
unit. To use Current Vehicle Location GPS devices must be
programmed accordingly and a fixed IP SIM card must be used, then
user will be able to click on the button in Live Monitoring and
request the vehicle position at that exact time.
(in gray color) for every
vehicle. The first option includes all alarmas that has been
preconfigured for this vehicule, the second icon is associated to
the commands activated for the vehicule. These commands have been
added in version 3: Engine Off, Light-Horn On/Off and Current
Vehicle Location. When the user moves the mouse over the icons, it
pops up the name of the functionality associated to each one. To
activate Engine Off and Light-Horn On/Off functionalities the user
has to use an electronic circuit installed together with the tracer
unit. To use Current Vehicle Location GPS devices must be
programmed accordingly and a fixed IP SIM card must be used, then
user will be able to click on the button in Live Monitoring and
request the vehicle position at that exact time.
The user can now filter what vehicle o groups of
vehicles will be shown in the map using Show Vehicle
Filter.
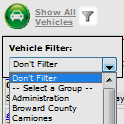
To restore all vehicle view, the user must
select No Filter option on the list.
After the client click on Show POI link he/she can select what POI
or group of POI , previously defined, will be shown in the map
using the filter icon.
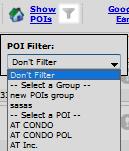
To restore All POI view, the client must click on
the filter icon and select Don’t Filter option in the drop
down.
Every vehicle that have installed the temperature sensors will
shows the temperature value as we can see in the following picture.

When the A/C compressor is OFF,
both: alarms icon and temperature values are shown in grey
color. If there is no alerts defined, when the REFEER compressor is
running the alarm icon goes to solid red and the temperature values
are shown in green color, as you can see in the following picture.
If there is a temperature alert defined, with minimum and maximum
thresholds and the temperature values are shown in green
color, it means these values are inside the range defined on the
temperature alert. 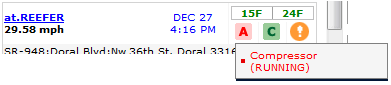
When the temperature value reach the maximum threshold defined in
the temperature alert, the value on Live Monitoring page is shown
in red color. If the sensor values go down and reach the
minimum threshold then the temperature value is shown in
blue .
Contact reseller to know how these functionalities work and how it
could be useful for your business. A VPN has to be
created between SIM provider and
at.Compass servers.
Vehicles Tab
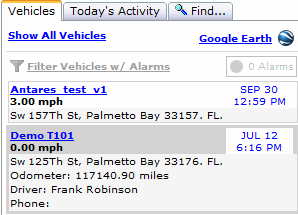 The first tab (Vehicles)
is where all the information regarding each vehicle is displayed.
The option Show All Vehicles indicates the system to remove any
filter and show all active vehicles and all the corresponding data.
The Google Earth option will open up Google Earth and will display
each vehicle on it. A nice feature that at.Compass offers is that
once Google Earth is open you will be able to track your GPS
devices. Google Earth connects every minute to the at.Compass
system to update each vehicle’s current position. To speed the
search for information we have programmed a link called Filter
Vehicles w/Alarms. This link will only show the vehicles that have
an active alarm. It is important to know that this alarm have to be
attended (click on it) in order to be cleared out. The next segment
is going to be dedicated to each vehicle registered in the system.
In this segment first you will see the name of the vehicle (in the
example Demo T101), next to it can be found the value associated
with the speed of the vehicle at the time of the monitoring. To the
right is the date and time associated to the data shown and next to
it will be the three signals A1, A2 y A3, each alarm will be
related to the alarms previously configurated in the menu
Administration/Preferences. The following information shown in our
example will be the physical address where the vehicle is located.
In the example next the physical address where the vehicle can be
located and according to the configuration selected in
Administration/preferences can be found the odometer with the miles
of the vehicle, the name of the driver associated with the vehicle
and the telephone number of the driver.
The first tab (Vehicles)
is where all the information regarding each vehicle is displayed.
The option Show All Vehicles indicates the system to remove any
filter and show all active vehicles and all the corresponding data.
The Google Earth option will open up Google Earth and will display
each vehicle on it. A nice feature that at.Compass offers is that
once Google Earth is open you will be able to track your GPS
devices. Google Earth connects every minute to the at.Compass
system to update each vehicle’s current position. To speed the
search for information we have programmed a link called Filter
Vehicles w/Alarms. This link will only show the vehicles that have
an active alarm. It is important to know that this alarm have to be
attended (click on it) in order to be cleared out. The next segment
is going to be dedicated to each vehicle registered in the system.
In this segment first you will see the name of the vehicle (in the
example Demo T101), next to it can be found the value associated
with the speed of the vehicle at the time of the monitoring. To the
right is the date and time associated to the data shown and next to
it will be the three signals A1, A2 y A3, each alarm will be
related to the alarms previously configurated in the menu
Administration/Preferences. The following information shown in our
example will be the physical address where the vehicle is located.
In the example next the physical address where the vehicle can be
located and according to the configuration selected in
Administration/preferences can be found the odometer with the miles
of the vehicle, the name of the driver associated with the vehicle
and the telephone number of the driver. 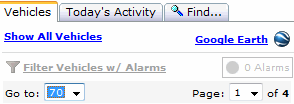 The information of
mileage, driver and telephone number will appear in the vehicle
once you click over the name. If the vehicle is not selected the
only parameters shown will be: name of the vehicle, date, selected
alarms and physical address of the vehicle. In addition once a
vehicle is selected the application will take us to a geographical
location in the map where you will be able to see the location of
the vehicle. When the amount of monitored vehicles is greater than
ten, you have two options to navigate to a specific vehicle. First:
Go to, to allow you to go to the vehicle that you are looking for,
directly or Page option to select the page you want to
show.
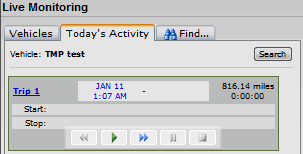
Today's Activity Tab
The second Tab, Today’s Activity is related to
the location of the vehicle previously selected since 12:00 am of
the current date, which will help you find the most recent trips of
the vehicle in question. Firstable you should select vehicle in
Vehicles Tab and then go to Today's activity tab and click on
Search to get all vehivles's trip.
The information of
mileage, driver and telephone number will appear in the vehicle
once you click over the name. If the vehicle is not selected the
only parameters shown will be: name of the vehicle, date, selected
alarms and physical address of the vehicle. In addition once a
vehicle is selected the application will take us to a geographical
location in the map where you will be able to see the location of
the vehicle. When the amount of monitored vehicles is greater than
ten, you have two options to navigate to a specific vehicle. First:
Go to, to allow you to go to the vehicle that you are looking for,
directly or Page option to select the page you want to
show.
Today's Activity Tab
The second Tab, Today’s Activity is related to
the location of the vehicle previously selected since 12:00 am of
the current date, which will help you find the most recent trips of
the vehicle in question. Firstable you should select vehicle in
Vehicles Tab and then go to Today's activity tab and click on
Search to get all vehivles's trip.
.
When the client click on the trip’s name, a new
set of controls were added. With these controls the client can make
an animation of the trip. In each geographical point where the unit
has sent packets, vehicle’s name, trip’s name, date and time is
shown inside a box as you can see in the following
picture.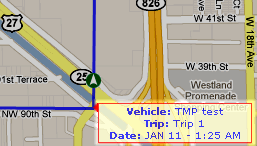
The third Tab, Find, has been designed to help the user in the
search of the vehicles registered in the application base on the
following criteria. First you need to understand that the search
criteria’s are associated to:
• Postal
addresses, which can be verified by the application, in the option
verify address.
• Postal addresses, which can be verified by
the application, in the option verify address.
• A point in the
map base on geographical coordinates, latitude and longitude in
grades, minutes and seconds. This coordinates can be obtained by
clicking a point in the map.
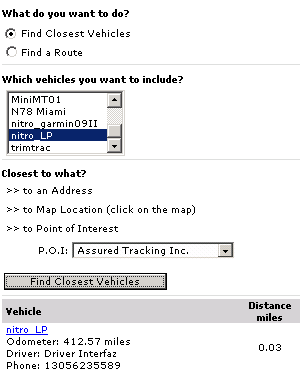
• A point of interest pre-defined in the system by the user. By
taking into consideration the previous search criteria, the user
will be able to obtain a list of the nearest vehicles to the
specified location. In the example to the left can be seen the
search of a verified address.
Once the vehicles are found the
results will tell you some additional information like the distance
to which one is located, the odometer, name and phone of the person
that is driving the vehicle . The user could click over
the name of the vehicle and the application will show you this
specific vehicle in the map.
The other 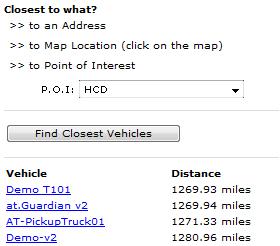 search criteria are
base on a location on the map. In this case the user can click in a
point over the map and automatically a geographical location will
be defined in grades, minutes and seconds. The same way by clicking
over Find Closest Vehicle, all the vehicles will be shown together
with their distance from the point selected. If the user clicks
over any of the vehicles they will be show on the map. The last
search criteria incorporated in this version 2.0 is based of Points
of Interest predefined by the client.Once a Point of Interest is
selected in the Drop Down Menu of P.O.I., the application will show
the vehicle or vehicles (according to the user’s selection in the
list of vehicles) the distance to which they are from the Point of
Interest and again by clicking over the vehicle in question it will
be shown in the Map.
search criteria are
base on a location on the map. In this case the user can click in a
point over the map and automatically a geographical location will
be defined in grades, minutes and seconds. The same way by clicking
over Find Closest Vehicle, all the vehicles will be shown together
with their distance from the point selected. If the user clicks
over any of the vehicles they will be show on the map. The last
search criteria incorporated in this version 2.0 is based of Points
of Interest predefined by the client.Once a Point of Interest is
selected in the Drop Down Menu of P.O.I., the application will show
the vehicle or vehicles (according to the user’s selection in the
list of vehicles) the distance to which they are from the Point of
Interest and again by clicking over the vehicle in question it will
be shown in the Map.
In the following paragraph we will talk about another function of
the application which is designed to find a route from a location
of a vehicle to any place. First the user needs to select in the
tab Find, that what they need to find is a route. Then, the
user need to select what type of route will be generated. There are
three types: Car, Truck or routes for Pedestrian.
Note: To use this funcionality the user
must be using MAP24 as map provider.
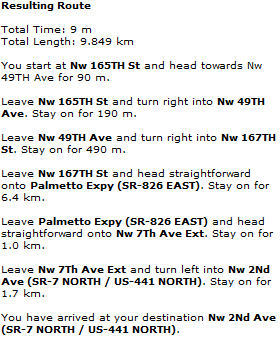 The next
step will be to select the vehicle for which a route needs to be
found baseon the three search criterias used by: the Postal
Address, a Point in the Map or a Point of Interest previously
defined by the user. The route will be shown in the map
inmediatelly. In addition the system will specify the amount of
time that the vehicle will take by taking this route and the total
distance from the location of the vehicle to the final destination
of this route. The system will show the user step by step
instructions from the point of origin to the desired destination
previously defined by the user based on a Postal Address, a point
in the Map or a Point of Interest.
The next
step will be to select the vehicle for which a route needs to be
found baseon the three search criterias used by: the Postal
Address, a Point in the Map or a Point of Interest previously
defined by the user. The route will be shown in the map
inmediatelly. In addition the system will specify the amount of
time that the vehicle will take by taking this route and the total
distance from the location of the vehicle to the final destination
of this route. The system will show the user step by step
instructions from the point of origin to the desired destination
previously defined by the user based on a Postal Address, a point
in the Map or a Point of Interest.
The search of a route from a point in the map or a Point of
Interest previously defined by the user will be the same as the
search of a vehicle. The result will always be shown on the map
which will be a big help when looking for the most efficient
routes, with less time or distance which will help the company be
more fuel efficient. 3D ROUTE FLIGHT: This is a great feature we
have included with at.Compass. On the map, click on Route Flight
(bottom and left on the map), then click on the 3D checkbox and
finally click on the play button. The route to follow will be shown
in an animation on the map letting you know every turn and the name
of the road.